
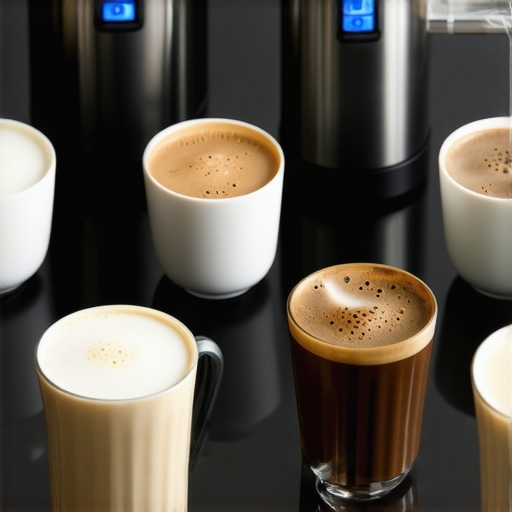
Best Milk Frothers & Steamers for Flawless Microfoam in 2024
Ever tried to craft that perfect, velvety microfoam at home, only to end up with bubbly, unruly foam that ruins your latte art dreams? I’ve been there. One morning, after a frustrating session of frothing milk that looked more like a science experiment gone wrong, I realized I was missing a crucial piece of the puzzle. It wasn’t just about having a fancy machine; it was about choosing the right tool to actually get that silky, cafe-quality microfoam every single time.
The Secret to Cafe-Quality Microfoam Without the Barista Price Tag
Today, I’m going to share how you can elevate your coffee game with the best milk frothers and steamers in 2024. Whether you’re a casual espresso sipper or a budding barista, knowing which tools reliably produce that perfect microfoam can transform your morning routine. Trust me, it’s not just hype—getting the right equipment makes a real difference. I’ll guide you through what to look for and how to avoid the common pitfalls I once fell into, such as over-foaming or under-heating milk. And yes, I’ll point you to some top contenders that have earned their place in my kitchen arsenal.
Why Do So Many Frothed Milk Attempts Fail?
Well, early on I made a big mistake—assuming that any frother could do the job. I bought a cheap handheld device, hoping it would magically turn my milk into something worthy of Instagram. Spoiler: It didn’t. Instead, I learned that the true key to microfoam is controlling temperature and air incorporation. According to espresso experts, microfoam is not just about frothing but achieving a specific texture—smooth, shiny, and lasting. For that, investing in a good-quality milk steamer or an advanced frother can be a game-changer. Curious about how to avoid common mistakes and pick the right device? I’ve got you covered. Check out this guide for detailed tips on creating microfoam that sticks and shines.
So, if you’ve ever faced the frustration of frothing milk that just won’t cooperate, stay tuned. We’ll explore the top tools, techniques, and insider secrets to get your microfoam flawless—every single time. Ready to turn your kitchen into a mini coffee shop? Let’s dive in!
Pick the Right Frother or Steamer for Your Needs
Start by choosing a device that matches your skill level and desired microfoam quality. For beginners, a simple handheld frother can work, but it often struggles with consistent microfoam. If you want professional results, invest in a dedicated milk steamer or an advanced electric frother. When I first tried steaming milk with a basic handheld device, I noticed uneven foam and difficulty controlling temperature, which led to a frustrating experience. Upgrading to a quality electric steamer transformed my mornings, giving me that silky microfoam every time.
Master the Art of Milk Temperature Control
Temperature is crucial. Microfoam forms best between 140°F and 150°F (60°C to 65°C). Use a device with temperature control or a built-in thermometer to avoid overheating, which causes the milk to lose sweetness and texture. I once overheated milk with a cheap frother, resulting in a scorched taste and bubbly foam. To prevent this, I now use a steamer with precise temperature settings, ensuring smooth, shiny microfoam that integrates seamlessly with espresso. For detailed techniques, check this guide.
Incorporate Air Effectively for Microfoam
Creating microfoam hinges on introducing the right amount of air. Start by positioning the steam wand just below the milk surface to introduce microbubbles. Then, raise the pitcher slightly to increase air intake gradually. When I practiced this, I initially got large bubbles and uneven foam. Slowly, I learned to listen for a gentle hissing sound, indicating optimal aeration. Practicing the technique with a thermometer helps maintain the right temperature while aerating. For expert insights, explore this resource.
Perfect Your Frothing Technique
Consistency comes with practice. Use a pitcher with a spout for better control during pouring. Keep the steam wand or frother moving in a circular motion to create fine, uniform microbubbles. I found that a steady hand and patience resulted in the best foam. After frothing, tap the pitcher on a countertop and swirl the milk to eliminate larger bubbles and improve shine. Watching tutorials like this one helped me refine my technique.
Final Tips for Microfoam Mastery
Always start with fresh, cold milk for better foam. Whole milk produces creamier microfoam, but you can experiment with alternatives. Clean your frother or steamer regularly to prevent residue buildup, which affects foam quality. Remember, achieving perfect microfoam is a blend of the right equipment, technique, and patience. Keep practicing, and soon your milk will rival those in your favorite coffee shop.
Many coffee lovers believe that creating perfect microfoam is just a matter of having the right equipment. But in my experience, this is only part of the story. A widespread myth is that any frother or steamer can produce cafe-quality microfoam if used correctly. The truth is, the nuances of milk temperature, air incorporation, and technique are often overlooked, leading to common mistakes that trap even seasoned baristas. Let’s dig deeper into what most people get wrong about microfoam and how to avoid these pitfalls.
Why Do So Many Frothed Milk Attempts Fail Even with Good Equipment?
One major misconception is that high-end machines automatically produce perfect microfoam. While quality tools do help, they do not compensate for improper technique. Many users assume that simply turning on the steamer and waiting will do the trick. However, microfoam requires precise control over milk temperature and gentle aeration. Overheating milk past 150°F can cause the proteins to denature, resulting in a grainy texture rather than silky microfoam. According to coffee science expert Dr. Scott Rao, controlling temperature and incorporating microbubbles gradually are key to consistent results (source).
Another common mistake is introducing too much air too quickly, which creates large bubbles instead of fine microbubbles. Many novices raise the pitcher too high or stir too vigorously, leading to bubbly foam that collapses quickly. Mastering the right technique—such as positioning the wand just below the surface and raising the pitcher slowly—can make all the difference.
Have you ever fallen into this trap? Let me know in the comments!
Advanced Tip: How to Achieve Microfoam That Lasts and Shines
For advanced users, the secret lies in combining precise temperature control with gentle, controlled aeration. Using a thermometer to monitor milk temperature during steaming can prevent overheating. Also, employing a pitcher with a spout and practicing steady, circular motion during frothing ensures microbubbles are uniform and stable. When done correctly, this microfoam not only looks stunning but also lasts longer without deflating. For detailed step-by-step techniques, check this resource.
In conclusion, the key to microfoam mastery isn’t just about equipment—it’s about understanding the delicate balance of temperature, air, and technique. Avoid the common myths, practice patience, and you’ll find that microfoam becomes second nature, elevating your coffee experience to professional standards.
Investing in reliable equipment is just the beginning; maintaining these tools ensures consistent microfoam quality over time. My go-to device is the Breville Barista Express, which combines a powerful steam wand with precise temperature controls. To keep it performing at its best, I regularly descale it using a mixture of water and vinegar every few months, following the manufacturer’s guidelines. This prevents mineral buildup, which can impair steam quality and lead to uneven microfoam. Additionally, I always clean the steam wand after each use with a damp cloth to remove milk residue, ensuring it doesn’t clog and maintains optimal airflow.
For electric frothers like the Nespresso Aeroccino, I recommend a simple routine: rinse the device immediately after use and occasionally run it with plain water to clear any milk residues. Some models come with cleaning disks or brushes—use them regularly to prevent buildup that can affect foam texture.
Looking ahead, I predict that smart, app-controlled frothers will become more common in 2024, offering features like automatic cleaning cycles and precise temperature adjustments. These innovations will make microfoam perfection even more accessible to home baristas.
How do I maintain my milk-steaming tools over time?
Consistent maintenance is key. Regularly descale your steamer or frother, clean the steam wand or frothing disc, and replace any worn gaskets or seals as needed. For manual steam wands, a quick purge before each use prevents milk from clogging the tip. Using filtered water can also extend the lifespan of your equipment by reducing mineral deposits. For detailed routines, check this guide.
Another tip is to invest in high-quality accessories, such as a stainless steel milk pitcher. Not only do these last longer than plastic ones, but they also withstand higher temperatures, making them easier to clean thoroughly and maintain their shape for precise pouring.
Don’t forget to deep clean your tools periodically. For example, soaking the steam wand in a vinegar solution helps dissolve milk residues that can harden over time, ensuring your microfoam remains silky and consistent. Regular upkeep not only prolongs the life of your equipment but also preserves the quality of your microfoam, turning everyday coffee into a barista-level experience.
To keep your tools in top shape, I recommend scheduling a monthly cleaning routine and always inspecting parts for wear. This proactive approach prevents unexpected breakdowns and keeps your mornings smooth and foam flawless.
Ready to take your microfoam to the next level? Try implementing a strict cleaning schedule and see how your equipment responds with improved performance and durability. For more advanced maintenance tips, explore this resource.
Unveiling the Unexpected Lessons Behind Perfect Microfoam
One of the most surprising realizations I had was that even the best equipment can’t compensate for a shaky hand or a lack of technique. I once believed that a high-end steamer would do all the work, but I quickly learned that mastering microfoam is more about patience and finesse than gadgets. The lightbulb moment came when I saw how subtle adjustments in pitcher angle and aeration speed dramatically improved my results, proving that consistent practice beats fancy tools every time.
Another lesson was the importance of milk quality. I assumed all milk was created equal, but discovering that fresh, cold, whole milk yields the best microfoam was a game-changer. It’s a reminder that even with perfect technique, the foundation—the milk itself—must be top-notch. Small tweaks like using cold milk and cleaning your frother regularly can elevate your microfoam from mediocre to professional-looking.
Lastly, I realized that your environment matters. A warm, dry kitchen helps maintain the right milk temperature and reduces the risk of introducing unwanted bubbles. Keeping your tools clean and your workspace organized creates a focused atmosphere where microfoam becomes second nature. These insights, born from trial, error, and curiosity, are what truly elevate your coffee craft in 2024.
My Top Picks for Elevating Your Coffee Game in 2024
For anyone serious about perfecting microfoam, I recommend starting with the Mastering Milk Frother Techniques guide. It’s packed with insider tips that helped me understand the nuances of aeration and temperature control. Additionally, the Secrets of Perfect Milk Steamer Crema opened my eyes to the science behind rich, stable foam. If you’re looking for a reliable equipment upgrade, the best milk frothers of 2024 combine ease of use with professional results. Lastly, don’t underestimate the power of maintenance; a simple routine of descaling and cleaning can preserve your tools’ performance for years to come, ensuring your microfoam remains consistently flawless.
I really relate to the struggles with getting that perfect microfoam at home. I’ve found that investing in a quality electric steam wand, like the Breville one I recently purchased, made a huge difference. The control over temperature and steam power means I don’t have to worry about over-heating the milk or ending up with bubbly foam. I also take the time to clean and descale it regularly, which keeps everything working smoothly. Interestingly, I’ve noticed that the type of milk also plays a big role—whole milk tends to give me the best silky texture, though I’ve been experimenting with almond milk to see what works. How do others here balance milk type and equipment for optimal results? I’d love to hear different tips, especially for those who prefer plant-based alternatives.
I completely agree with the importance of controlling milk temperature and incorporating air gently for that perfect microfoam. Over the years, I’ve found that investing in a good milk thermometer has saved me from overheating, especially since I tend to get distracted while steaming. Also, using cold, fresh milk has made a noticeable difference in the density and shine of the foam. I’ve been experimenting with plant-based milks like oat and cashew alternatives, and I’ve noticed that some brands foam up much better than others. Has anyone here found reliable plant-based options that produce comparable microfoam? I’d be curious to hear how others balance milk choice with their equipment to get that silky, lasting microfoam, especially for non-dairy options—which can sometimes be a bit tricky to work with.