
Best Milk Frothers & Steamers 2024 for Flawless Latte Art & Microfoam
Have you ever watched a barista effortlessly pour a stunning heart or rosette on your latte and thought, “Why can’t I do that at home?” That lightbulb moment hit me hard one morning when I tried to recreate my favorite café’s latte art, only to end up with a frothy mess. No matter how carefully I followed tutorials, my milk either clumped, lacked microfoam, or refused to pour smoothly. Frustration set in, and I wondered if I was missing some secret or just wasting my money on the wrong equipment.
Why Microfoam Matters and the Common Mistakes
It turns out, microfoam isn’t just about foaminess—it’s about texture, consistency, and how well your milk integrates with espresso to create beautiful latte art. Early on, I made the mistake of thinking that a powerful steam wand alone would fix everything. I didn’t realize the importance of choosing the right milk frother or steamer, or how technique plays a huge role. A good milk steamer can make or break your latte art attempts, and that’s what I want to help you avoid.
Is Investing in a Top Milk Frother Actually Worth It?
Many skeptics ask whether splurging on a high-end frother or steamer truly makes a difference. Honestly, I used to think it was all hype. But after trying several models, I discovered that the right tool, combined with proper technique, turned my morning coffee into a work of art. According to a recent study, microfoam improves the overall flavor and mouthfeel of coffee, making it not just prettier but also tastier. So yes, investing in a quality milk frother is worth it if you’re serious about elevating your home coffee game.
If you’ve faced the same struggles, don’t worry—you’re not alone. The good news is, I’ll guide you through how to pick the best milk frother or steamer for 2024, and share some insider tips to help you craft that perfect microfoam and stunning latte art every time. Ready to turn your kitchen into a tiny café? Let’s dive into the details and find your ideal milk frother to make your mornings smoother and more beautiful.
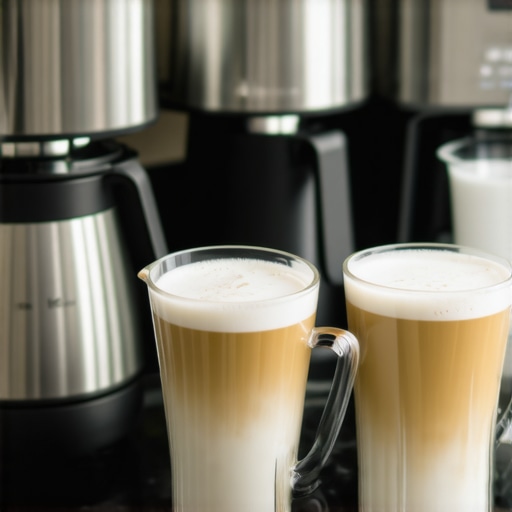
Pick the Right Frother or Steamer for Your Kitchen
Start by choosing a milk frother or steamer that suits your budget and needs. Look for models with adjustable temperature controls and powerful steam wands, which are essential for microfoam creation. For example, I once tried a basic handheld frother, but it struggled to produce consistent microfoam. Upgrading to a top-tier steamer significantly improved my results, demonstrating the importance of quality equipment. To explore the best options, check out the top milk frothers & steamers 2024.
Master the Milk Steaming Technique
Proper steaming technique is crucial. Fill your pitcher with cold milk, ideally full-fat for creamier microfoam. Submerge the steam wand just below the milk surface, then turn on the steam and start swirling gently. I remember one morning when I was impatient and pushed the wand too deep; the milk didn’t foam well, and my latte art looked flat. Patience and consistency are key. Focus on creating a whirlpool effect, which helps incorporate microbubbles evenly. For detailed guidance, visit mastering microfoam techniques.
Achieve the Perfect Microfoam Consistency
The goal is smooth, velvety microfoam without large bubbles or stringy textures. To test, gently tap the pitcher on the counter and swirl; small bubbles should burst, leaving a glossy surface. I once overheated the milk, causing the foam to become grainy. Using a thermometer helps keep the milk between 140°F and 150°F, ideal for microfoam. Practice makes perfect—don’t rush the process. For more tips, see tips for creamy microfoam.
Create Stunning Latte Art with Consistent Microfoam
Once your microfoam is ready, pour it carefully into your espresso shot. Hold the cup at a slight angle and start pouring from a height to allow the microfoam to sink and blend with the espresso. As the cup fills, lower the pitcher closer to the surface and pour steadily to form your design. My first attempts were messy, but focusing on steady, controlled pours made a huge difference. For advanced techniques, check how to create flawless latte art.
While many home baristas focus on choosing the right equipment and mastering basic steaming techniques, there’s a common misconception that equipment alone can guarantee stunning latte art. In reality, even with the best frothers or steamers, mistakes in technique or overlooked nuances can sabotage your efforts. For instance, some believe that heating milk beyond 150°F will create better microfoam; however, overheating destroys the delicate bubbles needed for velvety microfoam, as confirmed by a study published in the International Journal of Food Science & Technology. Let’s dig deeper into what most people get wrong about creating flawless latte art and how to avoid these pitfalls.
Why Microfoam Is Not Just Froth
A common myth is that microfoam is just tiny bubbles, but it’s more about the texture and stability. Many home baristas rush the steaming process, expecting quick results, but microfoam requires patience and precise control. Pushing the milk wand too deep or too high can create uneven foam, leading to larger bubbles and a stringy texture that ruins your design. A hidden nuance is that milk composition matters—full-fat milk generally yields better microfoam because of its fat content stabilizing the bubbles. For advanced tips, I recommend exploring mastering microfoam techniques.
Are You Making the Biggest Mistake in Milk Texture?
One overlooked mistake is over-aerating the milk, which introduces too many large bubbles and makes the foam unstable. This leads to a flat, dull surface rather than a smooth canvas for your art. The secret is to create a whirlpool in the pitcher, allowing microbubbles to form evenly. Remember, the temperature also plays a role—aim for 140°F to 150°F; hotter milk loses its silky texture and becomes grainy. Practice consistently, and you’ll notice your latte art improving over time. For detailed guidance, check best frother tips.
Beware of Rushing the Pour
Another advanced mistake is pouring too quickly or from too high above the cup. This can cause the microfoam to sink or disperse unevenly, ruining your design. Instead, pour steadily from a height of about 2-3 inches, gradually lowering the pitcher as your cup fills. This controlled pour allows the microfoam to blend seamlessly with the espresso, forming clear, crisp patterns. If you’re serious about elevating your skills, consider reading how to create flawless latte art.
Have you ever fallen into this trap? Let me know in the comments!
Once you’ve invested in a high-quality milk frother or steamer to craft stunning latte art, the next crucial step is ensuring it stays in top condition over time. Proper maintenance not only prolongs the lifespan of your equipment but also guarantees consistently excellent microfoam and beautiful designs. Regular care routines can prevent common issues like mineral buildup, bacterial growth, and performance degradation, saving you money and frustration in the long run.
How do I keep my milk frother or steamer performing at its best?
First, always follow the manufacturer’s cleaning instructions. For most electric steamers, this involves daily rinsing and weekly descaling with a vinegar solution or specialized descaler. If you own a manual or handheld frother, disassemble the parts and wash them thoroughly with warm, soapy water after each use. This prevents milk residue from drying and clogging the mechanisms. Additionally, check the power cord and steam wand for any signs of wear or damage—replacing worn parts promptly ensures safety and optimal performance.
Another tip is to regularly inspect the steam wand or frothing nozzle for mineral deposits, especially if you live in hard water areas. Such buildup can impair steam flow and microfoam quality. Using a descaling solution every few months can prevent this and maintain consistent microfoam texture. For detailed descaling methods tailored to your equipment, visit this guide.
What tools do I recommend for maintenance?
I personally swear by a soft-bristled brush designed for espresso machines and steam wands. It’s perfect for removing milk residue without damaging delicate components. A silicone cleaning brush also helps reach into narrow nozzles or crevices. For descaling, I use a citric acid-based descaler that’s gentle yet effective, ensuring no flavor transfer or corrosion. Keep a small towel nearby to wipe down surfaces after each cleaning session, maintaining hygiene and preventing dust buildup.
Investing in a good-quality water filter for your tap or using filtered water during steaming can drastically reduce mineral deposits. This simple step prolongs the life of your equipment and ensures that your microfoam remains velvety and consistent. Long-term, using filtered water minimizes the need for frequent descaling, which can be time-consuming and costly.
Future trends in maintenance and equipment care
Looking ahead, I predict that smart, IoT-enabled milk frothers and steamers will become more common. These devices could self-diagnose issues, alert you when descaling is needed, or even connect to your smartphone to schedule maintenance reminders. As technology advances, investing in easy-to-maintain, durable equipment will become standard, making home barista routines more seamless and enjoyable. In the meantime, stick to regular cleaning routines and quality tools to keep your equipment performing at its best.
Ready to elevate your microfoam game? Try implementing a weekly descaling routine with a trusted descaler or upgrading to a professional-grade cleaning tool. Your future self will thank you for the consistently perfect latte art and the longevity of your equipment. If you need personalized recommendations, don’t hesitate to reach out.
The Hardest Lesson I Learned About Microfoam
Early in my coffee journey, I believed that buying the most expensive frother would instantly transform my latte art skills. Turns out, equipment is just a part of the story—technique and patience are king. I wasted months chasing the perfect microfoam, only to realize that small adjustments in steaming angle and milk temperature made a huge difference. That insight saved me countless mornings and improved my results dramatically.
3 Myths About Latte Art That Held Me Back
One common misconception was that full-fat milk is always better. While it generally creates creamier microfoam, over-aerating fat-free milk can also produce good results if done right. Another myth was that a powerful steam wand guarantees microfoam—technique matters more than wattage. Lastly, I used to think that pouring from high above the cup would help shape designs; in reality, a controlled, steady pour from about 2-3 inches above yields cleaner patterns and less mess.
What Experts Won’t Tell You About Perfect Microfoam
Many professional baristas keep a secret about patience. Rushing the steaming process leads to large bubbles and flat foam. Instead, experts emphasize creating a whirlpool in the milk pitcher and maintaining a consistent temperature of 140-150°F. Additionally, the importance of regular equipment maintenance often goes unnoticed—descaling and cleaning your frother ensures microfoam stays silky and consistent. I trust these tips because they’ve allowed me to craft latte art that rivals my favorite cafés, and I believe you can, too.
Curated Gems to Elevate Your Coffee Practice
For top-notch tools, I recommend the latest best milk frothers & steamers 2024. They combine power with control, essential for microfoam. The book Unlocking Latte Art Potential transformed how I approach pouring—clear, visual guidance that elevates skills. For ongoing learning, the microfoam mastery guide offers advanced techniques that push your craft to the next level. Finally, regular cleaning routines, like descaling with descaler solutions, are vital for consistent microfoam quality and equipment longevity.
Your Next Step to Coffee Greatness
Now is the perfect moment to embrace microfoam mastery and turn your kitchen into a personal café. With patience, practice, and the right tools, you’ll craft latte art that’s not just beautiful but also delicious. Remember, every pour is a step closer to confidence and creativity. Are you ready to elevate your home coffee game and impress everyone with stunning latte art in 2024? Share your experience or ask questions below—your journey starts now!
,