
Ultimate Guide: Best Milk Frothers & Steamers for Flawless Latte Art
Ever found yourself attempting a perfect leaf or rosette on your cappuccino only to end up with a disappointing swirl or a layer of foam that’s more bubble than cream? I can’t tell you how many mornings I thought I had nailed that microfoam masterpiece, only to have it deflate or turn into a lumpy mess. There was this one notorious Sunday when I spent nearly an hour steaming and frothing, only to realize I’d used the wrong pitcher size and over-steamed the milk—ruining my shot at latte art fame before it even began. Talk about a lightbulb moment!
Why Getting Milk Microfoam Right Changes Everything
That experience was my wake-up call that mastering the art of frothing and steaming isn’t just about aesthetics—it’s about creating a stable, silky microfoam that holds its shape and helps you craft those picture-perfect designs. The good news? With a few simple tweaks and the right equipment, you can elevate your coffee game to pro-level latte art. This guide isn’t just based on theory; I’ve tested countless milk frothers and steamers, and I’ll share tested tips so you can avoid my early mistakes and get consistently stunning results. Just as a historian trusts primary sources, I recommend you dive into trusted resources like the Ultimate Guide to Milk Frother & Steamer Tips for Flawless Latte Art for in-depth insights.
Is Milk Frothing Technology Overhyped? Do I Really Need Fancy Equipment?
Believe me, I was skeptical at first—thinking I could get away with cheap frothers, but I quickly learned that not all tools deliver café-quality microfoam. Early on, I wasted money on devices that struggled to heat the milk evenly or produced large bubbles instead of that glossy, dense microfoam. The key is understanding which features truly influence your foam consistency. Once I invested in a quality steamer and practiced the right techniques, my latte art took a giant leap forward. If you’re serious about perfecting your craft, I suggest exploring some pro tips on mastering milk frother techniques.
So, are you tired of inconsistent foam or feeling hesitant to try latte art yourself? You’re not alone. Many coffee lovers face the same hurdles, but the right knowledge and equipment can make all the difference. Stay tuned—I’m about to walk you through how to choose the best frother or steamer for your needs and show you some simple techniques to turn steamed milk into a canvas for your creativity. Let’s elevate that morning brew!
,
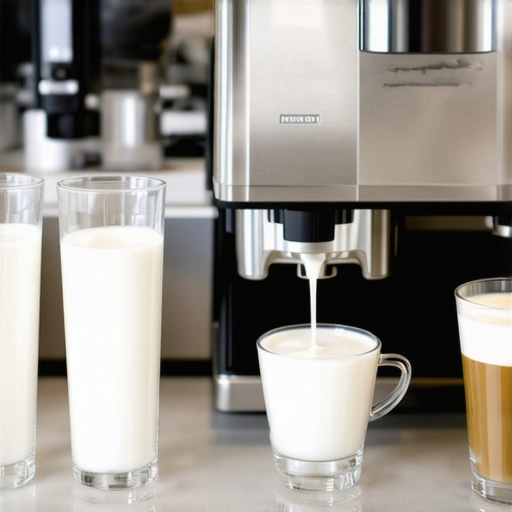
Choose the Right Milk and Equipment
Select fresh, cold milk—whole milk produces creamier foam, while skim milk creates lighter, denser microfoam. Use a high-quality milk frother or steam wand that allows precise control over temperature and airflow, ensuring consistent results. I once experimented with a cheap frother, but it sputtered and produced inconsistent foam; upgrading to a professional steamer transformed my technique. For optimal microfoam, I recommend exploring expert insights via this comprehensive guide.
Master the Milk Temperature
Heat the milk gradually, aiming for approximately 140°F (60°C). Overheated milk breaks down proteins, leading to larger bubbles instead of smooth microfoam. I once over-steamed milk, and it became runny and flat—I learned the importance of patience and precise temperature control. Use a thermometer or a steaming device with temperature regulation. Remember, even a few seconds can make a difference; practice to develop a feel for the right temperature.
Position the Steam Wand Correctly
Insert the wand just below the surface of the milk, angling it slightly to create a vortex—similar to stirring with a spoon—spinning the milk to introduce air evenly. When I first tried, I kept the wand too deep, resulting in large bubbles and flat foam. By adjusting the depth and angle, I started producing glossy, velvety microfoam. If you struggle, check out this step-by-step tutorial for detailed visuals.
Introduce Air Gradually
Begin by creating a gentle hissing sound, drawing in just enough air to form tiny bubbles. Once the milk expands slightly and feels warm to the touch, submerge the wand deeper to continue heating without adding more air. Think of it like kneading dough—you want to incorporate just enough air to make it fluffy without deflating the structure. I once added too much air early on, resulting in bubbly milk that collapsed when poured. Practice the timing carefully.
Swirl and Texture the Milk
After steaming, remove the wand with a quick flick and gently swirl the pitcher to integrate the microbubbles into a smooth, shiny milk. This step polishes the foam, removing any larger bubbles. I used to pour immediately, but swirling helped me achieve that silky, paint-like consistency ideal for latte art. The goal is a mirror-like surface that pours smoothly—like pouring syrup onto a pancake. For more advanced techniques, see this detailed guide.
Practice the Pour
Begin pouring from a height to spread the milk evenly, then lower the pitcher closer to the cup to allow the foam to settle on top. Shake the pitcher gently to control the flow, creating patterns like hearts or rosettas. During my early attempts, fluctuations in pouring speed caused the foam to break apart, ruining patterns. By maintaining a steady hand and consistent pace, I started seeing cleaner, more precise designs. Watching tutorials on professional pouring techniques can accelerate your progress.While many coffee enthusiasts focus on the basics of milk frothing and latte art, there are nuanced pitfalls that even seasoned baristas sometimes overlook. One widespread misconception is that achieving perfect microfoam is solely about heated milk; however, the temperature control is a subtle but critical factor. Overheating milk above 150°F (65°C) causes proteins to denature prematurely, resulting in large bubbles and flat foam, which severely hampers intricate latte art designs. To master microfoam, it’s essential to not only monitor temperature precisely—using a thermometer or a high-quality steamer—but also to understand that microfoam is a result of stable protein structures. For a deeper dive into this, check out this detailed guide. Another advanced mistake involves the incorrect incorporation of air—beginning too aggressively or too late in the steaming process can lead to inconsistent foam with larger bubbles, destroying the smooth surface needed for fine art. Patience and timing are everything; introducing air gradually and adjusting the wand’s position seasonally enhances foam quality. Many believe that all frothers create microfoam equally, but in reality, the design and airflow control of your equipment profoundly influence the final result. Investing in a quality milk steamer ensures you won’t waste time correcting preventable issues. An often overlooked nuance is the importance of swirling the milk after steaming. This step aligns the protein strands and smooths out residual large bubbles, creating the glossy surface ideal for pouring detailed patterns. Skipping this step can result in uneven foam that breaks apart during pouring. In fact, this resource highlights how swirling complements steaming to produce café-quality microfoam consistently. Lastly, aspiring latte artists should beware of rushing the pour. A common mistake is pouring too quickly or from too high, which distorts the foam’s delicate structure. Mastering pour techniques—such as starting with a gentle flow and lowering the pitcher gradually—ensures the microfoam integrates seamlessly into your beautiful designs. Remember, these advanced nuances distinguish a good barista from a great one. As you refine your technique, keep experimenting with equipment and timing. Want to elevate your microfoam skills even further? Explore this comprehensive tutorial. Have you ever fallen into this trap? Let me know in the comments.Maintaining your milk frother and steamer is crucial for consistently achieving perfect microfoam and designing stunning latte art. Invest in a high-quality, durable device such as the professional-grade milk steamer that offers precise temperature and airflow controls. Regular cleaning after each use prevents residue buildup that can clog the steam wand or introduce bacteria, harming flavor and foam consistency. A simple routine of rinsing with warm water and a gentle descaling solution quarterly keeps your equipment operating efficiently, much like maintaining a well-oiled machine. For long-term results, consider replacing worn-out seals or parts as recommended by the manufacturer, which prevents pressure leaks that compromise foam quality. As the trend shifts toward smarter coffee equipment, exploring advanced machines with integrated sensors for temperature and airflow can significantly elevate your microfoam mastery. Looking ahead, innovations in automated milk frothers with AI calibration might become standard, providing even more consistent results with minimal effort.
How do I maintain my milk frother and steamer over time?
Proper maintenance is your best bet for sustained performance. Focus on thorough cleaning after each session—use a damp cloth for exterior parts and run a cleaning cycle or soak the steam wand in vinegar solution to remove milk residue and mineral deposits. Regular descaling, especially if you have hard water, prevents mineral buildup that affects heating and airflow. Always inspect the steam wand’s nozzle for clogs and clear blockages with a needle or small brush. Store your equipment in a dry, dust-free environment to prolong its lifespan. If you encounter persistent issues like uneven steam or foaming problems, consult the resource here for expert advice. Remember, a well-maintained milk steamer is the foundation of consistent, cafe-quality microfoam, so dedicate time to its upkeep. Want to elevate your technique further? Try calibrating your device’s temperature settings according to the detailed tips found here and watch your latte art skills soar.
The Hardest Lesson I Learned About Cappuccino and Microfoam
One of my most persistent struggles was realizing that perfect microfoam isn’t just about frothing the milk; it’s about controlling every tiny detail — from temperature to airflow to pouring technique. I used to think that thicker foam meant better art, but I learned that silky, stable microfoam was the true secret. That breakthrough came when I finally understood the importance of patience during steaming and the subtle art of swirling—those small adjustments made a world of difference and transformed my latte art from clumsy to professional-looking.
Tools That Transformed My Approach to Latte Art
Investing in a high-quality milk steamer changed everything. My go-to was the professional-grade milk steamer, which granted me precise temperature and airflow control. To deepen my knowledge, I turned to resources like this comprehensive guide, which helped me troubleshoot common issues and refine my technique. Remember, choosing the right equipment isn’t just about cost but about the control it provides, ensuring consistent microfoam every time.
Ignite Your Passion and Pour with Confidence
Creating stunning latte art is more than a skill—it’s a form of expression that can turn a simple coffee into an artwork. Whether you’re just starting or looking to perfect your craft, embrace the journey with patience and curiosity. The future of cappuccino crafting is bright, especially as technology advances and your confidence grows. Keep practicing, trust your instincts, and remember that every cup is an opportunity to delight with your artistry.
What’s the biggest obstacle you’ve faced in mastering microfoam and latte art? Share your story below — I’d love to hear how you’re transforming your coffee experience!
,
Reading through this comprehensive guide really resonated with me, especially the emphasis on gradual air incorporation and temperature control. I used to rush the steaming process, which often led to larger bubbles and uneven microfoam, but now I take my time and focus on patience. What I found interesting is how small tweaks in technique, like swirling the milk after steaming, can significantly improve the quality of latte art. I wonder, for those who’ve switched from basic frothers to more advanced steamers, what was the biggest noticeable improvement? For me, it was the consistency of the microfoam, which made pouring intricate designs much easier. It’s exciting to see how equipment and technique combine to elevate coffee artistry so much. Do others have recommendations for budget-friendly steamers that still deliver quality results? I’m curious to hear experiences and tips from fellow enthusiasts!
I really relate to the importance of patience and technique in creating quality microfoam. Like many, I started with an inexpensive frother, but I quickly noticed how inconsistent my foam was, especially when I tried more intricate designs. Upgrading to a good steam wand and focusing on gradual heating, as mentioned in this post, made a world of difference. Swirling after steaming, as highlighted here, really helps in creating that smooth, glossy surface that’s crucial for latte art.
One challenge I faced was getting the right milk temperature—initially, I’d overheated the milk without realizing it, which resulted in large bubbles. Using a thermometer and practicing the feel of the milk made me much more consistent. For others just starting out or looking for budget options, I’d suggest checking out steamers with good reviews on controlled airflow or even used professional models. Have any fellow readers found affordable steamers that still produce café-quality microfoam? Would love to hear your recommendations or any tips on balancing price and performance.
Wow, this post really emphasizes the critical nuances in milk steaming that often get overlooked, especially for beginners. I totally agree that small tweaks—like the angle of the steam wand and the timing of introducing air—can make a world of difference. I remember starting out with a basic frother and feeling frustrated when I couldn’t recreate those sleek rosettas. Transitioning to a good quality steamer and practicing precise temperature control instantly boosted my microfoam consistency. It’s fascinating how such minute adjustments, like swirling the milk after steaming, can lead to more polished designs. I also think that patience during the process is key—trying to rush often results in large bubbles or flat foam. I’d love to hear if anyone has tips for maintaining their equipment to keep that microfoam flawless over time. Do you think investing in a more advanced, maybe semi-automatic machine, is worth it for hobbyists looking to better their latte art? I’m excited to try some of the techniques mentioned here—thanks for such detailed insights!
This post really hits home on the importance of technique and patience in creating microfoam that lasts and pours beautifully. I remember struggling with large bubbles when I first started, only to realize I was rushing the steaming process and not paying enough attention to temperature control. The tip about swirling the milk after steaming is a game changer; it really smooths out the foam and makes pouring patterns much easier. I’ve switched to a mid-range steamer and the difference in texture is astonishing—more consistent microfoam that holds its shape longer. For anyone on a budget, I recommend checking out used professional steamers or those with adjustable airflow—sometimes you can find surprisingly good deals that bring improved results without breaking the bank. Have others noticed a significant difference in microfoam stability when upgrading to more advanced devices? Would love to hear your experiences on this!”,
This post really highlights the importance of small technical details in achieving perfect microfoam for latte art. I completely agree that patience and the correct handling of the steam wand make a noticeable difference. I used to rush the steaming process, which led to uneven foam with large bubbles that collapsed quickly. What really helped me improve was focusing on the angle and depth of the wand, along with gradually introducing air. Since then, my latte art has become much cleaner and more consistent. One thing I found useful was investing in a thermometer to precisely control the milk temperature—aiming for that sweet spot around 140°F. For those on a budget, I’d suggest looking for steamers with adjustable airflow or even used professional units, as they often come at a lower price but deliver excellent results. How do others here balance the need for great equipment with budget constraints? Would love to exchange tips on achieving café-quality microfoam without breaking the bank.
I’ve found that investing in a decent steam wand has truly transformed my ability to create microfoam that holds its shape during pouring. I used to think all frothers could give me similar results, but the difference in control and consistency is quite noticeable. Additionally, practicing the gradual introduction of air and maintaining patience really made a huge impact. I’ve also started using a thermometer regularly, which prevents overheating and large bubbles, aligning with the points discussed here. One thing I’ve learned along the way is that the quality of your milk and fresh-to-use ingredients also influence the final outcome. Has anyone experimented with alternative types of milk, like oat or almond, for microfoaming? I’m curious whether plant-based milks can achieve the same stability and smoothness, or if they require specific techniques.