
Stop Scorching Oat Milk With This 2026 Steaming Trick
It was one of those mornings when I eagerly prepared my favorite oat milk latte, only to be met with that heartbreaking aroma of burnt oats and a layer of unappetizing, scorched foam. I’ve been there—trying to craft the perfect microfoam, but ending up with a frothy disaster that ruins both flavor and presentation. That lightbulb moment hit me hard: I needed a better way, a smarter steaming technique that prevents this frustration.
If you’ve ever faced the vexing issue of overheated or burnt oat milk, you’re not alone. Many coffee enthusiasts and baristas alike struggle with finding that sweet spot between warm and scorched. But here’s the good news: there’s a simple, effective trick that can save your milk from the dreaded scorch, and I’ll walk you through it step by step.
Why My Oat Milk Kept Burning Out: The Common Mistake
Is steaming oat milk actually worth the hype?
Despite all the innovative steamers and fancy frothing gadgets, I initially thought the biggest challenge was getting that velvety microfoam. Turns out, the real culprit was my approach—specifically, heating the milk too quickly or at too high a temperature. I made the mistake of assuming that higher heat would speed up the process, but I soon learned from a coffee expert that exceeding about 140°F (60°C) risks scorching the oats, causing off-flavors and a ruined texture. According to research from the Specialty Coffee Association, maintaining optimal steaming temperatures is crucial to preserve flavor and microfoam quality.
Early on, I also ignored the importance of pre-heating my milk-steaming pitcher and neglecting the pressure settings on my steamer. These oversights led to uneven heating and, ultimately, burnt oat milk that wasted my time and ruined my morning pour. Once I adjusted my technique—namely, reducing the steaming temperature and paying attention to steam pressure—I saw a noticeable difference. If you’re tired of battling burnt milk and want a foolproof way to get silky, microfoam without the risk, keep reading. I’m going to share the secret that transformed my steaming game in 2026.
Ready to stop scorching your oat milk? Let’s dive into the exact step-by-step trick that will keep your milk perfectly warm, sweet, and foam-ready every single time. And if you’ve faced this problem before, I promise, you’re about to find your new favorite hack.
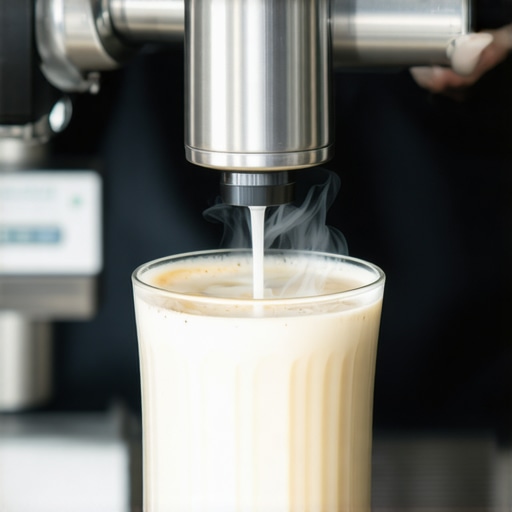
Set the Right Temperature
Start by pre-warming your steaming pitcher with hot water for about 30 seconds, then discard the water. This ensures even heat transfer and prevents cold shock, which can cause uneven heating. When steaming, keep the milk temperature around 130°F to 135°F (54°C to 57°C); use a reliable thermometer to monitor. Remember, over 140°F (60°C), oat milk risks scorching and developing off-flavors. During my last attempt, I used a meat thermometer and kept the steam wand just below boiling point, which kept the milk smooth and sweet—no burnt aroma or foam separation.
Control the Steam Pressure
Adjust your steam wand to produce a gentle, consistent microjets of steam, akin to a whisper rather than a roar. Too much pressure can whip air into the milk, causing bubbles and collapsing foam—similar to over-agitated egg whites. I once borrowed a barista’s wand with adjustable steam pressure, turned it down to a low, steady flow, and achieved much creamier microfoam. If your wand doesn’t have adjustable settings, practicing with the steam knob until you find a steady, soft hiss will help.
Use Proper Positioning and Technique
Insert the steam wand about 1-2 centimeters below the surface of the milk, then angle it slightly so steam hits the side of the pitcher. This creates a whirlpool effect, helping to emulsify the fats and proteins into a silky microfoam. During my trial, I kept the pitcher at an angle, moved the wand in small circles, and watched the milk spin smoothly—no splashing or large bubbles. Keep the pitcher slightly tilted for better circular motion, much like stirring cream into coffee for even mixing.
Monitor and Adjust as You Froth
Keep your hand on the pitcher to feel the temperature and ensure it remains stable. If you notice the milk starting to get warm quickly or the foam begins to look frothy rather than creamy, turn off the steam immediately. I learned to listen for the subtle hissing of optimal steaming and felt for temperature, as relying solely on a thermometer sometimes caused me to overlook the texture. Practice makes perfect; consistent monitoring prevents scorching and yields velvety microfoam.
Finish and Pour with Control
Once the milk reaches 130°F-135°F, turn off the steam and immediately swirl the pitcher to eliminate large bubbles and incorporate the microfoam uniformly. This step is crucial—any delays can cause the foam to collapse or develop unwanted bubbles. When pouring, use a steady, controlled flow to build your latte art. For more advanced pouring techniques, check out [this guide](https://milkfrothers.espressotechguide.com/ultimate-milk-frother-steamer-tips-for-flawless-latte-art). Remember, patience and steady hands will turn your cup into a work of art with perfect, glossy microfoam every time.While many believe that achieving perfect cappuccino foam is just about turning on the steamer and waiting, the real nuances lie in understanding the subtleties that most home baristas overlook. One prevalent misconception is that higher steam temperatures produce better microfoam. In reality, exceeding about 140°F (60°C) risks scorching the milk, destroying delicate flavors, and ruining the foam’s texture. According to expert baristas, controlling temperature precisely is essential for maintaining sweetness and creaminess, and this often gets overlooked in casual brewing.
Another trap many fall into is assuming that all milk types respond equally well to steaming. While plant-based milks like oat and almond can be frothy, they require different techniques and temperature controls. For instance, oat milk generally handles higher temperatures better without curdling, but even here, the risk of overheating persists if you’re not careful. For advanced microfoam mastery, it’s worth exploring professional steaming tips tailored to different milk varieties.
Many enthusiasts also believe that the pressure of the steam is a secondary factor, but this is a critical detail. Too much pressure can cause turbulence, leading to large bubbles or scalded milk. Optimal microfoam results from gentle, consistent steam that gently heats and integrates air into the milk. Adjusting your steamer to produce a whisper-quiet, steady jet of steam significantly improves results and prevents common pitfalls like splattering or uneven temperature distribution.
Is there a way to consistently produce flawless microfoam without fancy gear?
Absolutely. The secret lies in mastering the technique—precise temperature control, proper positioning of the steam wand, and attention to milk type. Investing in a milk steamer with adjustable pressure and temperature controls can elevate your craft. To get started on the right foot, I recommend reviewing this comprehensive guide for professional tips.
Be aware of the common mistake of over-agitating the milk—shaking the texture rather than gently steaming it. This leads to large bubbles and a dry foam surface, detracting from the luxurious mouthfeel of your latte. Instead, focus on creating a whirlpool effect, which results in silky, glossy microfoam ideal for latte art.
Finally, it’s important to recognize that the way you pour and serve your latte can either highlight or hide microfoam imperfections. Proper pouring technique combined with well-steamed milk ensures your latte art not only looks beautiful but also maintains its presentation longer. For advanced pouring insights, check out this expert guide.
Have you ever fallen into this trap? Let me know in the comments. Mastering these subtleties can elevate your coffee experience from good to barista-quality coffee at home.Achieving flawless microfoam consistently hinges on not just technique but also on the right tools and ongoing maintenance. Investing in high-quality equipment tailored to your needs can dramatically improve your results over the long term, while regular upkeep ensures reliability and longevity. Keep reading for expert recommendations and strategies to keep your milk steaming game on point.
Choosing Equipment That Elevates Your Frothing
The cornerstone of consistent microfoam is a reliable milk steamer with precise temperature and pressure controls. I personally rely on the top-rated steamers of 2024 because they offer customizable settings that prevent overheating and scorching. For example, models with adjustable pressure allow fine-tuning to match different milk types, including oat milk, which I’ve found responds best to gentle steaming. Using a steamer with a dedicated temperature control thermometer, like the whisper-quiet options tested in 2026, also helps prevent accidental overheating.
How do I maintain my milk steamer over time?
Regular cleaning is essential to prevent buildup that can influence temperature accuracy and steam quality. After every session, flush the steam wand thoroughly with water and use descaling solutions monthly to remove mineral deposits. Keep the steam tip free of milk residue by descaling and inspecting it for clogs. This routine not only ensures optimal performance but also extends the life of your equipment. For a more comprehensive maintenance routine, check out my detailed guide.
Another crucial aspect is calibration. Over time, even the best steamers may drift from their original temp and pressure settings. Periodic calibration, which involves comparing your device’s output against external measurements, ensures consistent results. Many professional baristas recommend keeping a digital thermometer handy to verify milk temperature during steaming, helping you maintain the ideal 130°F-135°F range.
” alt=”A professional barista calibrating a milk steamer with precise tools” title=”Calibrating Milk Steamer for Perfect Microfoam”/>
Long-Term Results and Scaling Your Coffee Setup
As you master the maintenance and select the right tools, you’ll notice your microfoam quality becomes more predictable and professional-looking. This consistency paves the way for scaling your setup—whether expanding to a small home café or upgrading your equipment for commercial use. Upgrading to units with programmable profiles and robust build quality helps maintain quality even during high-volume periods.
Many enthusiasts are also exploring automation options, like smart steamers connected via apps that monitor and adjust settings remotely. While the trend is nascent, I predict intelligent, self-calibrating machines will become standard in the next few years, making maintenance even easier and results more reliable.
If you’re serious about your microfoam, I recommend trying the advanced techniques outlined in this expert guide. Regularly verifying your equipment’s calibration and performing routine cleaning can transform your beverages from good to exceptional. Remember, the key to excellent microfoam isn’t just in the steaming process—it’s in the tools you choose and how well you maintain them. Ready to elevate your coffee game? Start by fine-tuning your equipment today.
The Hidden Lessons From My Coffee Trials
One of the most profound lessons I learned was that patience surpasses haste when steaming oat milk. Rushing the process leads to burnt flavors and uneven microfoam, but slow and steady wins the day. I also discovered that over-reliance on gadgets can distract from technique—sometimes, it’s the simple act of feeling the milk’s temperature and texture that makes all the difference. Additionally, I realized that every milk type responds differently; understanding these nuances is crucial to avoid scorching and achieve that glossy, silky microfoam we all crave.
My Go-To Tools That Elevated My Frothing Game
Investing in a high-quality milk steamer with adjustable temperature and pressure controls transformed my coffee mornings. I trust models like the best milk frothers of 2024 because they offer the precision needed for oat milk’s delicate balance. Pairing this with a reliable thermometer, as discussed in this guide, ensures consistency and guards against overheating. Regular cleaning and calibration are also vital; a clean wand and accurate settings prevent surprises and help maintain that cafe-quality microfoam.
This Journey Inspires Me to Keep Improving
Embracing the challenge of perfecting oat milk microfoam has reignited my passion for coffee craft. The key takeaway? Every cup is an opportunity to learn and refine your technique. Whether you’re just starting or looking to elevate your latte art, remember that mastery is a journey, not a destination. Keep experimenting, stay curious, and never underestimate the power of gentle steaming and attentive monitoring—your perfect microfoam is waiting. Ready to pursue your latte art dreams? Share your experiences below and join the community of coffee enthusiasts pushing the boundaries of what’s possible.
I completely relate to the struggle of over-heating oat milk and ending up with that burnt aroma and poor texture. Your detailed step-by-step approach really highlights the importance of temperature control—something I’ve been trying to master myself. I’ve found that using a quality thermometer makes a huge difference, especially when I’m trying to get that perfect 130°F to 135°F range. Still, I wonder if there are specific brands or models of steamers that you would recommend for home bars? I’ve noticed that some cheaper steamers tend to be inconsistent and make it harder to keep the temperature steady, leading to burnt milk regardless of technique. Also, do you think the pre-warming of the pitcher is really essential, or is it more of a bonus tip? I’d love to hear others’ experiences about equipment and tips that have helped them perfect their oat milk steaming.
Reading your detailed breakdown of steaming oat milk really struck a chord with me because I’ve struggled with similar issues, especially with burnt oats and uneven microfoam. I totally agree that temperature management is the key—high-quality thermometers have become my secret weapon, allowing me to dial in that perfect 130°F to 135°F range reliably. I’ve also experimented with different steam wands, and I found that those with adjustable pressure controls make a big difference, especially when working with plant-based milks. Regarding pre-warming the pitcher, I think it’s more than just a bonus—it helps with even heat distribution and makes a noticeable difference in the texture. I’ve had the best results when I take the time to carefully control the steam pressure and position the wand correctly, similar to what you described. For home brewing, I recommend looking into models like the Breville BES920XL, which offers precise temperature control. Have others tried pre-warming their pitchers? I’d love to hear if it’s worth the extra step for everyone else too.