
Best Milk Frothers & Steamers for Perfect Microfoam in 2024
Have you ever tried to create a beautiful latte art and ended up with a milk pool instead of a perfect fern or rosette? I remember the moment I realized my old frother couldn’t deliver the velvety microfoam needed for those intricate designs. It was frustrating, especially after investing so much time perfecting my espresso shot. That lightbulb moment made me understand: the real magic lies not just in the coffee but in the milk—how it’s steamed, frothed, and poured.
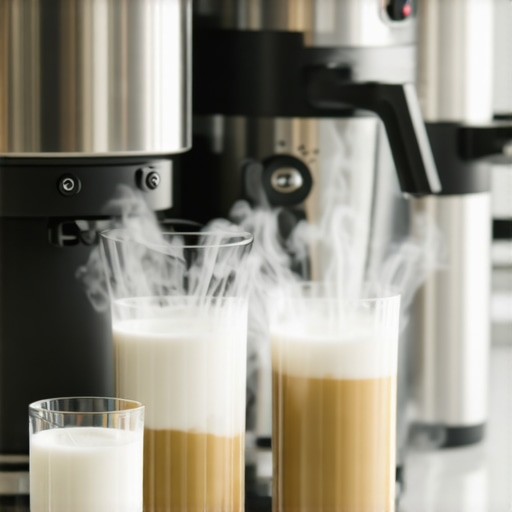
The Struggle for That Dreamy Microfoam
Every coffee enthusiast dreams of pouring that flawlessly textured microfoam that turns a simple latte into art. But so many of us face the same hurdles: inconsistent foam, clumpy textures, or worst of all, no foam at all. When I started experimenting with different milk frothers and steamers, I learned that not all devices are created equal. Some just heat milk; others actually master the art of microfoam—those tiny, uniform bubbles that make latte art possible. In 2024, choosing the right tool can be a game-changer. And trust me, I’ve tried it all—from manual whisks to high-end steamers. The secret is finding a device designed for microfoam mastery.
Is the Hype Worth It, or Just Overpriced Gadgetry?
Naturally, a part of me wondered if all the fuss about advanced milk frothers is just fancy marketing. I’ve made mistakes early on, like over-foaming milk or overheating it, which ruined the texture and flavor. One particular error was relying solely on my old frother without understanding the steaming process—leading to rubbery foam and lost time. Now, I realize that insight and technique are just as important as choosing the right equipment. If you’ve faced similar frustrations or doubts, you’re not alone. The good news is that with the right guidance, you can achieve microfoam that rivals even the best coffee shops. For some expert tips, check out this comprehensive guide on [microfoam techniques](https://milkfrothers.espressotechguide.com/master-microfoam-milk-steamer-techniques-for-perfect-lattes).
So, are you ready to ditch inconsistent results and elevate your coffee game? The next sections will walk you through selecting the best milk frother and mastering techniques that guarantee stunning latte art every time. Stay tuned!
Choose the Right Milk and Equipment
Start with cold, fresh milk—whole milk typically yields the creamiest microfoam, but skim milk can produce larger bubbles if steamed properly. Select a milk frother or steam wand capable of precise temperature control and consistent steam pressure. For best results, invest in a device designed for microfoam mastery—check out our recommendations in the top milk frother steamer tips for perfect latte art in 2024.
Prepare Your Equipment and Milk
Clean your frothing device thoroughly to remove any residual milk or scale, which can affect steam pressure and foam quality. Pour cold milk into your pitcher, filling it no more than one-third to allow space for expansion. Position your steam wand just below the surface of the milk, close to the side of the pitcher to create a vortex, essential for even microfoam formation. For more detailed setup instructions, see ultimate milk steamer guide for perfect latte art.
Stream and Froth with Precision
Turn on the steam, and listen for a consistent hissing sound—this indicates proper pressure. Keep the wand tip just below the surface to introduce air steadily; this creates tiny bubbles crucial for microfoam. Simultaneously, tilt the pitcher to allow the milk to spin in a whirlpool, which helps break down larger bubbles into smaller, uniform ones. Aim for a temperature of around 140°F (60°C)—use a thermometer if needed. I remember my first attempt ending in over-airing the milk, creating large bubbles and ruining the texture; adjusting my wand position fixed those issues. Practice makes perfect. For advanced techniques, visit master microfoam with top milk frothers and steamers.
Achieve the Perfect Microfoam Consistency
As the milk approaches temperature, lower the steam wand slightly to stop adding air and focus on heating the milk smoothly. Aim for a silky, glossy texture that flows like molten metal—no large bubbles or frothy clumps. Tap the pitcher gently on the counter to settle the bubbles, then swirl it to integrate the microfoam uniformly. It’s like polishing a gemstone—every swirl refines the surface. Early attempts often resulted in uneven foam or even burnt milk—learning control over your wand’s position helps prevent these mistakes. For deeper insights, check secrets of perfect milk steamer crema in late morning.
Pour with Confidence and Style
Hold the pitcher close to the cup’s surface and pour steadily to create a base. Once the cup is about half full, lift the pitcher slightly higher and pour with a steady, wiggle motion to form a leaf or rosette. Think of pouring as painting—your wrist and flow need to be controlled but fluid. The key is timing—if you pour too early or too late, your design may distort. Watching tutorials, like how to unlock latte art potential at night, can help refine your technique. With practice, your latte art will become as precise and beautiful as the best baristas. Remember, patience and consistent technique are your best allies in this craft.
Many passionate home baristas believe that mastering milk steaming is simply about reaching the right temperature or choosing the fanciest frother. However, what most people get wrong is overlooking the subtle techniques and common myths that can sabotage even the best equipment. For instance, a prevalent misconception is that a high-end milk frother guarantees perfect microfoam. In reality, technique matters more than the device itself—speed, angle, and control play pivotal roles in achieving that silky texture that results in stunning latte art.
Another counterintuitive truth is that over-foaming or over-steaming can degrade microfoam quality. Some think that extending steam time yields better results, but in practice, this often leads to large, uneven bubbles or burnt-tasting milk. The key is understanding that microfoam is about small, uniform bubbles, created through precise control. For an in-depth look at fine-tuning your technique, check out advanced microfoam tips.
Why does frothing technique beat the equipment every time?
Despite the marketing hype, even the most sophisticated device cannot compensate for poor technique. A common advanced mistake is relying solely on automatic functions without manual intervention. Skilled baristas actively adjust wand position and listen for the hissing sound to control texture and temperature—this mastery can be learned with practice. According to a documented study on microfoam formation, precise control over airflow and temperature significantly enhances microfoam stability and visual appeal.
Moreover, many overlook the importance of starting with cold, fresh milk and clean equipment. Residual milk or scale buildup affects steam pressure, leading to inconsistent results. A simple yet often neglected tip is to tap the pitcher gently after steaming, helping to settle larger bubbles for a smoother finish. Remember, becoming a latte artist isn’t just about hardware; it’s about understanding the interplay between your tools and technique.
By challenging common myths—like the necessity of expensive gadgets or prolonged steaming sessions—you can focus on refining skills that truly make a difference. Want to elevate your microfoam mastery? Dive deeper into the techniques that top baristas swear by. Have you ever fallen into this trap? Let me know in the comments.
Remember, achieving professional-level latte art is less about equipment and more about the deliberate practice of understanding and controlling your process. Keep experimenting, stay curious, and your skill will soon rise to new heights.
Keeping Your Milk Frother and Steamer in Peak Condition
Investing in high-quality milk steamers and frothers is just the first step; maintaining them properly ensures long-term performance and consistent results. Regular cleaning is vital to prevent milk residue buildup, which can impair steam pressure and affect microfoam quality. After each use, disassemble removable parts—like steam wands and frothing pitchers—and wash them with warm, soapy water. For integrated machines, follow the manufacturer’s cleaning cycle instructions carefully to avoid damage. A clean device not only prolongs its lifespan but also guarantees the silky microfoam essential for stunning latte art.
Tools I Recommend for Maintenance and Performance Optimization
Personally, I swear by a few tools that make routine maintenance straightforward. A silicone cleaning brush is excellent for scrubbed cleaning of steam nozzles—preventing clogging caused by dried milk. Additionally, using a descaling solution once a month helps remove mineral deposits, especially if you live in hard water areas. For precise temperature control during steaming, a digital thermometer is indispensable; it helps avoid overheating milk, which can compromise texture and taste. I also recommend investing in a set of replacement gaskets and o-rings, as worn seals cause steam leaks and inconsistent microfoam. All these tools, combined with a disciplined cleaning routine, keep your equipment performing optimally.
How do I maintain my equipment over time?
Consistency is key in keeping your milk steamer and frother functioning flawlessly. Schedule monthly descaling using a manufacturer-approved solution; neglecting this can lead to calcium buildup that hampers steam pressure. Always wipe down the steam wand immediately after use to prevent milk from hardening and clogging the nozzle. When not in use, keep your devices covered or stored in a dry, dust-free place to prevent debris accumulation. Regularly inspecting parts like gaskets and replacing them as needed will sustain airtight seals, maintaining optimal steam generation. Embracing these practices translates to better microfoam and, ultimately, more impressive latte art.
In the future, I see advancements in self-cleaning steamers integrated with sensors that monitor build-up and suggest maintenance intervals—making upkeep effortless for enthusiasts and professionals alike. For more detailed tips on maintaining microfoam quality over time, check out this comprehensive guide. Try incorporating a regular cleaning schedule today, and experience the difference in your microfoam’s creaminess and stability. Proper maintenance not only extends your equipment’s lifespan but also preserves the artistry in every cup.
My Hidden Lessons in Microfoam Mastery
One of the most surprising realizations on my journey to perfect latte art was that even with the best equipment, technique still reigns supreme. I used to think upgrading my frother would instantly improve my designs, but I found that consistent practice and a keen ear for steam pressure made all the difference. A lightbulb moment was understanding that microfoam is about control and patience—rushing the process only leads to large bubbles or burnt milk. Embracing this, I discovered that slow, deliberate steaming creates the silky texture I craved, elevating my latte art from amateur scribbles to professional-looking patterns.
Tools That Keep My Coffee Game Strong
Over time, I’ve refined my toolkit with some trusted resources that truly make a difference. A high-quality digital thermometer has become indispensable for monitoring milk temperature precisely, helping me avoid over-steaming. Regularly using a silicone cleaning brush ensures my steam wand stays free of dried milk, preventing pressure drops that ruin microfoam. I also swear by descaling solutions to keep my equipment performing at its best, especially in hard water areas. These small investments in maintenance and measurement have consistently paid off, delivering microfoam that’s velvety and stable—perfect for intricate latte art.
Chasing a Dream That’s Within Reach
If you’re eager to elevate your coffee game, know that your progress is just a matter of time and perseverance. Mastering milk steaming might seem daunting at first, but every small tweak—adjusting your wand angle or stretching your steaming time—brings you closer to that silky microfoam. Remember, every expert barista started where you are now, fumbling with frothing and pouring. Use resources like this guide to refine your technique and see steady improvements. With dedication, your latte art will become a canvas of your personality—so go ahead, take that leap, and pour with confidence!