
How to Achieve Flawless Microfoam with Milk Steame and Frother Tips
It was a morning like any other, but as I stared at my steaming cup of coffee, I realized something was missing. Despite following all the online tips and tricks, my milk still lacked that silky, velvety texture that makes a latte truly special. Frustration crept in as I watched my microfoam deflate before my eyes, ruining the beautiful latte art I desperately wanted to create. It was a lightbulb moment—sometimes, even the simplest tasks can become the most elusive challenges.
Why Perfect Microfoam Is Actually a Game Changer for Coffee Lovers
Many of us love coffee, but few understand the art behind crafting that perfect, velvety microfoam. It’s not just about steam or a frother; it’s about patience, technique, and understanding the science of milk. Achieving flawless microfoam transforms a good brew into an extraordinary one, elevating your coffee experience and impressing friends with latte art that looks like it belongs in a café.
Is Microfoam Really That Important or Just Hype?
I used to think all froth was created equal—until I made the mistake of rushing the process early on. My initial attempts involved just heating the milk quickly and hoping for the best, which resulted in large bubbles and a thin texture. I realized that my error was neglecting the true purpose of steaming milk: creating a dense, smooth microfoam that seamlessly integrates with espresso. Experts emphasize that microfoam isn’t just aesthetically pleasing; it also influences how flavors meld, creating a richer, more balanced cup. According to Roast Magazine, the perfect microfoam has a tiny, uniform bubble structure, which enhances both taste and presentation.
If you’ve faced the same struggle—trying to get that smooth, glossy milk—know that you’re not alone. I’ve been there too. And I’ve learned that with the right equipment, technique, and a touch of patience, mastering microfoam is entirely within reach. Ready to stop guessing and start creating top-tier café-quality milk? Let’s dive into the secrets that turned my morning coffee routine around—and can do the same for you.
Choose Your Milk and Equipment Carefully
Start with fresh, cold milk—whole milk often yields the best microfoam due to its fat content, which creates a creamier texture. Use a quality milk frother or steam wand; even entry-level steamers can produce professional results with proper technique. When selecting equipment, consider options like top milk frothers and steamers that are known for consistency and ease of use.
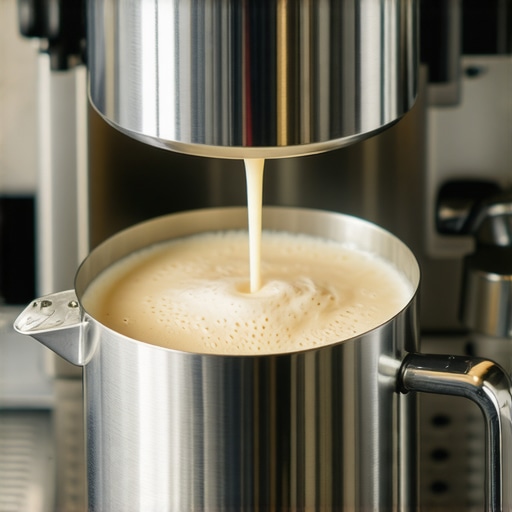
Master the Art of Texturing Milk
Pour milk into your pitcher—ideally stainless steel—and position the steam wand just below the surface of the milk. Turn on the steam and start by incorporating air: hear a gentle squeak or hissing sound. Visualize this like a gentle whirlpool, creating tiny bubbles. As the milk warms, submerge the wand deeper to heat evenly, aiming for around 150°F (65°C). Consistent swirling ensures a uniform, glossy microfoam.
Getting the Right Texture
Think of microfoam as a smooth silk fabric rather than a sponge full of bubbles. Use a thermometer to monitor temperature, ensuring you don’t overheat—this can ruin the microstructure. Practice makes perfect; I vividly remember my first attempt, where milk spilled over and formed large bubbles. With patience and adjustments—like angling the pitcher slightly—I achieved that perfect velvety texture, which was a game changer for my latte art.
Create a Steady Pour for Stunning Art
Hold your cup at a slight angle and pour from a steady height, starting with the pitcher tip close to the surface to create a base. As the cup fills, lift the pitcher gradually and manipulate the flow to form patterns like hearts or rosettas. The key is consistent, controlled pouring—think of it as sketching with milk. Watching instructional videos on latte art techniques can help refine your skills.
Refining Your Technique
Remember, slight adjustments in pour angle or speed can make a big difference. Practice timing your pour for when the microfoam reaches the desired glossiness. I recall struggling initially, but focusing on a slow, steady pour transformed my designs from messy to intricate. It’s about consistency—an aspect that can be honed through dedicated practice, similar to mastering milk foamer techniques.
Avoid Common Mistakes That Spoil Microfoam
Steer clear of overheating milk, which causes it to become grainy and lose its silky texture. Use a thermometer or learn to judge by touch—warmth should be comfortable, not hot. Also, resisting the temptation to stir vigorously after steaming helps keep the microstructure intact. I learned this the hard way when my milk turned frothy and big-bubbled, ruining my attempts. Instead, gentle swirling in the pitcher keeps the microfoam uniform and ready for pouring.
Practice and Patience Pay Off
Remember, creating flawless microfoam is a skill that develops over time. Each session, aim for incremental improvements—experiment with steaming times, pouring speeds, and angles. As you refine your technique, your latte art will become more intricate and impressive. Keep a positive mindset; every failed attempt is a step closer to barista-quality microfoam. For comprehensive tips, explore the ultimate guide to microfoam mastery.
Many coffee enthusiasts believe that creating the perfect cappuccino or latte art boils down to simple steps or relying solely on high-end equipment. However, these misconceptions often lead to frustration and subpar results. Let’s clarify some of the most prevalent myths and pitfalls that even seasoned baristas can fall into, so you can elevate your coffee game.
First, there’s the misconception that a powerful steam wand automatically produces the best microfoam. In reality, *technique outweighs power*. Many assume that more steam pressure equals better foam, but overzealous steaming can lead to large, uneven bubbles and burned milk. Instead, controlling the wand’s position and steam power, along with practicing consistent aeration, is crucial. For a detailed breakdown of mastering steam wand techniques, explore this [comprehensive guide](https://milkfrothers.espressotechguide.com/master-microfoam-milk-froster-techniques-for-perfect-lattes).
Another common myth is that any milk will do once it’s heated. The truth is, *your choice of milk and its freshness significantly influence microfoam quality*. Whole milk tends to create creamier, denser microfoam due to its fat content, but plant-based options like oat milk are increasingly popular. Fresh, cold milk froths better and maintains stability longer. So, don’t just heat and foam any milk—select high-quality, fresh ingredients.
Many beginners also fall for the trap of rushing the steaming process. The belief that ‘quicker is better’ leads to over-heating milk and destroying its delicate microstructure. It’s better to take your time, monitor temperature accurately—aim for around 150°F (65°C)—and stop steaming once you reach the ideal warmth. Remember, patience pays off in creating silky microfoam.
For advanced enthusiasts, the misconception that *latte art relies solely on pouring technique* can be limiting. While pouring skill is essential, *the foundation lies in the microstructure of the milk itself*. Without proper microfoam, intricate patterns become impossible. Fine-tuning your microfoam creates the perfect canvas for latte art. For those seeking to push their skills further, learn how an [advanced milk frother](https://milkfrothers.espressotechguide.com/unlocking-latte-art-potential-with-advanced-milk-frother-tips-at-night) can unlock new possibilities.
Now, a question for the more experienced: **How does milk temperature impact the stability of microfoam over time, and what techniques best preserve it during extended sessions?** Interestingly, research indicates that maintaining optimal temperature with controlled steaming minimizes microfoam breakdown, thereby extending its lifespan. Ensuring consistent heating and gentle swirling after steaming helps preserve the microstructure and prevents large bubbles from forming, especially useful during busy mornings or when preparing multiple drinks.
In summary, mastering cappuccino and latte art isn’t just about buying expensive equipment or following beginner tutorials. It involves understanding the science behind milk textures, controlling the steaming process, and choosing quality ingredients. Avoid these common pitfalls, refine your technique, and you’ll notice your results improve dramatically.
Ready to take your microfoam to the next level? Check out this [guide to perfect milk steaming](https://milkfrothers.espressotechguide.com/secrets-of-perfect-milk-steamer-crema-a-late-morning-guide) and start practicing intentionally. Have you ever fallen into this trap? Let me know in the comments.Maintaining your equipment and choosing the right tools are crucial steps in ensuring consistent, high-quality microfoam for your coffee creations. Personally, I rely on a precision thermometer to monitor milk temperature accurately, preventing overheat and preserving microstructure. A reliable thermometer like the digital milk thermometer allows me to hit the ideal 150°F (65°C) every time, which is essential for stable microfoam.
In addition to a thermometer, investing in a high-quality stainless steel steaming pitcher significantly impacts the microfoam texture. I favor a 12-ounce pitcher with a narrow spout, as it gives me better control over pouring and latte art design. Regularly inspecting my steam wand for cleanliness ensures no milk residue affects steam quality, and I back this up with thorough weekly descaling using descaling solutions recommended by manufacturers. This routine prevents mineral buildup, ensuring longevity of your steamer and consistent steam power.
To streamline your workflow, I suggest using a dedicated milk frothing jug that stays cold and is reserved solely for steaming. This prevents contamination and temperature fluctuations. Furthermore, employing a good-quality milk steamer with adjustable steam pressure, like the electric milk steamer, can elevate your microfoam consistency across multiple drinks.
Forecasting the future, smart appliances with integrated temperature controls and auto-shutoff features are becoming increasingly popular. They promise to reduce user error and optimize milk steaming for perfect microfoam every time, aligning with trends toward automation in craft coffee.
### How do I maintain my coffee tools over time?
Regular cleaning is non-negotiable. Rinsing your steam wand immediately after each use prevents milk residue hardening. Descaling your steamer every one to two months, depending on water hardness, maintains performance and extends the lifespan of your equipment. Periodically checking for wear and tear on your steam wand, gasket seals, and pressure valves ensures smooth operation. For detailed maintenance routines, refer to the manufacturer’s guidelines.
Finally, experimenting with different tools, such as specialized latte art pens or microfoam shakers, can add flair and consistency to your designs. Practice with these advanced techniques and tools, and you’ll find your microfoam smoothness and latte art stability improve dramatically. For expert tips on elevating your microfoam game, explore microfoam mastery techniques. Give one of these tools a try today and notice the difference in your coffee craft—consistent microfoam is just an equipment upgrade away!
What I Won’t Tell You About Perfect Microfoam
The hardest lesson I learned was patience. Rushing the steaming process crushed my hopes of silky microfoam, teaching me that slow, deliberate movements yield the best results. I also discovered that even a tiny angle change in pouring can transform a messy design into café-quality latte art. Lastly, I realized that investing in quality equipment, like a reliable steam wand, makes a difference I can see and taste, turning everyday coffee into a moment of pride.
My Top Picks for Coffee Tools That Make a Difference
For anyone serious about microfoam, a digital milk thermometer is indispensable. It keeps the milk at that perfect 150°F, preventing overheat. A narrow-spouted stainless steel pitcher gives me the control needed for intricate latte art. I also trust top-rated milk frothers and steamers for consistent results. And for refining technique, I consult the microfoam mastery guide. These tools are the foundation of my coffee success.
Embrace the Journey: Your Coffee Future Awaits
Creating flawless microfoam isn’t just a skill—it’s an art that elevates your entire coffee experience. Don’t let fear or impatience hold you back. Every attempt is a step toward mastery. With dedication and the right tools, you’ll wow friends and enjoy barista-quality drinks every morning. Your perfect microfoam moment is within reach—start today and watch your skills blossom.
This article really hits home for me because I used to struggle with microfoam, especially achieving that glossy, velvety texture. What made a huge difference was switching to a quality stainless steel pitcher and investing in a good thermometer—those small tools helped me control temperature precisely and prevent that grainy, over-heated microfoam. I agree with the emphasis on patience; rushing definitely ruins the microstructure. The tips about slowly swirling and avoiding vigorous stirring are game changers. From my experience, consistent practice is key—sometimes, I still find myself tweaking the pouring angle or trying different steaming times. I’d be curious to hear how others balance their technique between speed and care, especially during busy mornings when time is limited. Has anyone found particular tricks or routines that help maintain microfoam quality when making multiple drinks in quick succession? I think refining these small habits can really elevate our coffee craft.