
How to Achieve Flawless Microfoam with Milk Steamer & Frother Tips
Ever watched a barista craft that perfect, velvety microfoam and felt a little pang of envy? I’ve been there. I remember my first shaky attempts at steaming milk, ending with bubbly, lifeless foam instead of that smooth, glossy texture everyone raves about. It was frustrating—like trying to paint a masterpiece with a brush full of glue. But here’s the truth: achieving cafe-quality microfoam isn’t about luck or fancy equipment alone. It’s about understanding the process, avoiding common mistakes, and practicing with purpose.
Why Microfoam Matters More Than You Think
Microfoam isn’t just a pretty face for latte art; it’s the backbone of a good coffee experience. It affects the mouthfeel, flavor release, and the visual appeal of your drink. When done right, microfoam can turn a simple cup of coffee into an artful masterpiece. But many of us give up too soon, thinking it’s too complicated or that our frother isn’t powerful enough. I’ve learned the hard way that patience, technique, and a few insider tips can make all the difference.
Today, I promise to walk you through the secrets of creating that perfect, silky microfoam every time. We’ll cover how to avoid common pitfalls, which tools deliver the best results, and simple tricks that elevate your steaming game. Whether you’re a beginner or a seasoned home barista, this guide will help you turn your milk into magic.
Is Microfoam Really Worth the Hype
One mistake I made early on was thinking that all frothers are created equal. I splurged on an expensive machine, only to find my foam was still inconsistent. It took some trial and error, and reading expert advice—like from the folks at the ultimate guide to milk frother techniques, I discovered that technique matters more than equipment. It’s a common misconception that high-end machines are the only path to perfect microfoam. Sometimes, it’s just about mastering the basics.
If you’ve ever wondered whether microfoam is just a fancy trend or actually makes a difference, you’re not alone. I used to think the same—until I saw how a silky layer of microfoam transformed my latte into a work of art. Now, I’m convinced it’s one of those small details that can elevate your coffee experience from average to exceptional. So, if you’re ready to stop settling for frothy blobs and start creating that smooth, glossy microfoam, keep reading. The next sections will break down exactly how to do it, step by step.
Get the Milk Ready Before You Steam
Start with fresh, cold milk, ideally whole milk for creaminess or your preferred alternative. Pour about one to two inches of milk into your steaming pitcher—this gives enough space for the foam to expand without overflow. Remember, the quality of your milk influences the microfoam, so choose good-quality, fresh milk for best results. When I first tried steaming, I used leftover milk from the fridge, and it was a disaster—bubbles everywhere. Now, I always start with cold milk and see the difference in texture.
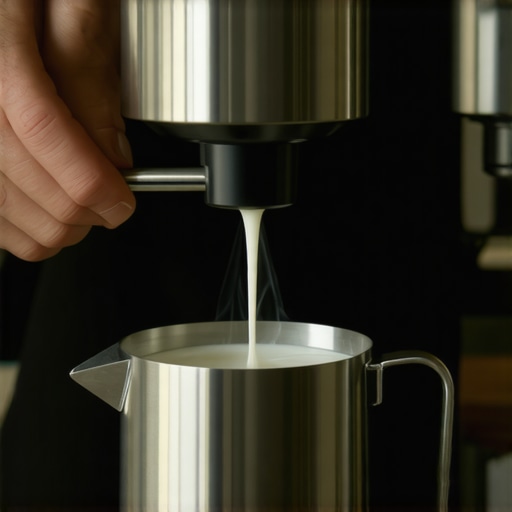
Position the Steam Wand Correctly
Submerge the steam wand just below the surface of the milk, angling it slightly to create a gentle whirlpool. This swirling motion helps incorporate air evenly and produces a silky microfoam. I once placed the wand too deep, and instead of smooth microfoam, I got large bubbles that took forever to break down. Experiment with the depth until you find that sweet spot—just below the surface for most machines.
Control the Steam and Temperature
Turn on the steam and listen for a consistent, gentle hissing sound—this indicates steady steam flow. Keep your hand on the pitcher; once the milk feels comfortably warm (around 140°F to 150°F), turn off the steam. Overheating destroys the microstructure, making foam watery or burnt-tasting. I used to rush, overheating the milk, but now I pay attention to the temperature, and my microfoam has dramatically improved.
Creating That Smooth Microfoam
Once steaming begins, keep the pitcher at a slight angle, and tilt it to maintain a vortex. This motion ensures the air integrates smoothly into the milk, creating tiny, uniform bubbles. After about 20 seconds, you should see the milk texture change—becoming shiny and silky. If you see large bubbles or the milk looks frothy and dull, you need to restart. Practice makes perfect; I spent a few mornings practicing until I could consistently produce velvety microfoam.
Finish with a Gentle Tap and Swirl
After steaming, gently tap the pitcher on a counter to break any larger bubbles, then swirl the milk to smooth out the surface. This step refines the microfoam, preparing it for latte art. I once neglected this step, and my latte art looked messy. Now, I always give the pitcher a quick swirl, and my designs come out crisp and professional-looking.
Pour with Purpose
Hold your cup at a slight angle, start pouring slowly from a height to blend the milk with the espresso, then move closer and pour more steadily to create shapes like hearts or rosettas. The key is to control the flow and height of the pour. Watching tutorials and practicing pouring techniques helped me develop my skills—check out this guide for advanced tips.
Remember, consistency is key. Even if your first attempts are rough, keep practicing. Over time, your milk will become smoother, and your latte art more intricate. Microfoam mastery isn’t magic; it’s technique and patience in action.
Many enthusiasts jump into the world of microfoam and latte art with high hopes, but often fall prey to misconceptions that hinder their progress. One of the most persistent myths is that expensive equipment guarantees perfect microfoam. While top-tier machines can make the process easier, mastering the basics—like proper milk temperature, positioning of the steam wand, and vortex creation—are far more crucial. In fact, a study from the Ultimate Guide to Milk Frother Techniques reveals that technique trumps equipment quality for microfoam consistency.
Another common mistake is overheating the milk. Many home baristas believe that hotter milk results in better foam, but in reality, temperatures above 150°F begin to break down the milk’s proteins, leading to a watery, lifeless microfoam. The key is to aim for around 140°F–150°F, maintaining control over the steam wand to avoid scorching or boiling the milk, which destroys the microstructure.
What advanced home baristas should ask: Does the size of the steam wand matter for microfoam quality?
Absolutely. A smaller, more precise steam wand allows for better control of airflow and milk rotation, resulting in finer, more stable microfoam. Larger wands can introduce turbulence, creating larger bubbles and inconsistent texture. This nuance is often overlooked by beginners but is a game-changer for those striving for café-level microfoam. According to Master Microfoam Techniques, choosing a wand with a variable steam control and a narrower tip can significantly elevate your microfoam craftsmanship.
Furthermore, many home baristas underestimate the importance of practice with purpose. Rushing the process or neglecting steps like tapping out bubbles or swirling the milk can lead to uneven microfoam that hampers latte art. Remember, microfoam mastery is about consistency and attention to detail—something that takes deliberate practice. For more advanced tips, check out Creating Flawless Microfoam.
Finally, don’t fall into the trap of thinking that latte art is only about pouring technique. The microfoam’s texture and stability directly influence your ability to create intricate designs. A thick, uneven foam can make even the most skilled pour look messy. Achieving that silky, paint-like consistency is the secret to stunning latte art. If you’re serious about refining your skills, consider consulting this guide for professional insights.
Have you ever fallen into this trap? Let me know in the comments—mastering microfoam is a journey, and every mistake is a step closer to perfection!
Investing in top-quality milk frothers and steamers is just the beginning; maintaining these tools over time is essential to ensure they continue delivering that silky microfoam and perfect latte art. Proper upkeep not only prolongs the lifespan of your equipment but also guarantees consistent results, transforming your home coffee experience into that of a professional barista.
How do I keep my milk frother and steamer in optimal condition?
Start with regular cleaning. After each use, disassemble removable parts like the steam wand tip and milk pitcher, then rinse thoroughly with warm water. For steam wands, wipe the exterior with a damp cloth to remove milk residue, and purge the wand by opening the steam for a few seconds to clear any milk buildup inside. I personally use a dedicated cleaning brush for the steam tip, which prevents clogging and maintains consistent steam flow. For internal cleaning, especially in steamers, descaling is crucial. I recommend a descaling solution every 1-2 months, depending on usage frequency, to prevent mineral buildup that hampers performance. For detailed cleaning routines, check out the Mastering Milk Steamer Techniques guide, which emphasizes regular maintenance for cafe-quality results.
What tools do I recommend for long-term maintenance
My go-to tool is a small, flexible brush designed for steam wand tips; it ensures no milk residue blocks airflow. Additionally, I use a microfiber cloth for wiping down the exterior, keeping it free of fingerprints and milk splashes. For internal descaling, I prefer a citric acid-based descaler, which is gentle yet effective. I also keep a silicone milk frothing pitcher dedicated solely for cleaning to avoid cross-contamination. When selecting replacement parts like steam tips or gaskets, always opt for OEM (original equipment manufacturer) components to guarantee perfect fit and function. Investing in quality cleaning supplies and spare parts pays off by reducing maintenance costs and preventing costly repairs down the line.
Forecasting the future of maintenance in coffee equipment
As technology advances, I predict that more milk frothers and steamers will incorporate self-cleaning features and smart sensors to alert users when cleaning or descaling is needed. This trend will make maintenance easier and more foolproof, ensuring consistent microfoam quality regardless of usage frequency. In the meantime, establishing a routine cleaning protocol, as outlined in the Ultimate Guide to Milk Steamer Tips, will keep your equipment performing at peak levels. Don’t underestimate the power of regular upkeep—your microfoam will thank you!
If you want to elevate your maintenance game further, try using a dedicated descaling solution monthly and keep your steam tips clean with a fine brush. These small steps make a noticeable difference in performance and longevity.
Lessons the Coffee World Won’t Tell You
- Consistent Temperature Is Key: I used to think hotter milk meant better foam, but I learned that maintaining a precise temperature around 140°F–150°F is what really matters. Overheating destroys the milk’s delicate proteins, leading to lifeless microfoam. This one realization transformed my steaming skills overnight.
- The Right Tools Make a Difference: I once believed that any frother would do, but switching to a smaller, more controlled steam wand improved my microfoam dramatically. A wand with adjustable steam control and a narrow tip allows for finer, more stable microfoam—trust me, it’s worth the investment.
- Patience Beats Speed: Rushing the process only led to large bubbles and uneven foam. Taking time to position the wand correctly, create a vortex, and gently swirl afterward results in silky microfoam perfect for latte art. Practice with purpose, not haste.
- Technique Trumps Equipment: Reading expert guides, like this ultimate guide, taught me that mastering simple techniques is more impactful than expensive gear. Focus on your method, and the results will follow.
- Microfoam Is an Art, Not Just a Skill: The texture and stability of your microfoam directly influence your latte art. Achieving that glossy, paint-like finish allows for intricate designs. It’s a small detail that elevates your coffee from good to stunning.
My Favorite Tools for Coffee Excellence
- Steam Wand with Variable Control: For precise microfoam, I recommend a wand with adjustable steam flow and a narrow tip. It gives you better control over airflow and milk rotation.
- Microfiber Cleaning Brushes: Regularly cleaning your steam wand tip prevents clogging and maintains consistent steam quality. I swear by a dedicated brush for this task.
- Descaling Solutions: Keeping your equipment free of mineral buildup with citric acid-based descalers ensures longevity and performance. Monthly maintenance makes a huge difference.
- Guides and Tutorials: Resources like this detailed guide have been instrumental in my journey to perfect microfoam and latte art.
Step Into the World of Microfoam Mastery Today
Creating cafe-quality microfoam isn’t just a skill; it’s an art form that transforms your daily coffee into a canvas. With the right mindset, tools, and techniques, you can elevate your home barista game and craft stunning latte art that impresses family, friends, and yourself. Remember, consistency and patience are your best friends on this journey. So, what’s your next step to perfecting microfoam? Let me know below—your coffee masterpiece awaits!
This article really resonated with me, especially the emphasis on technique over equipment. I used to think that my inexpensive steamer couldn’t produce good microfoam, but after practicing the vortex technique and controlling the temperature carefully, I saw a huge improvement. It’s fascinating how small adjustments can lead to such big changes. I agree that patience and practice are key—I’ve spent mornings perfecting my pour and swirl to get that glossy finish. One tip I’d add is timing your steam and pour to match the espresso shot for better integration of flavors. How do others here balance the timing between steaming and pouring for optimal latte art? I’m curious if anyone has found specific routines that help sync everything smoothly.
I completely relate to the struggle of creating that perfect microfoam initially. It’s so easy to underestimate the importance of small details like milk temperature and wand positioning—those are game-changers. After many mornings of trial and error, I found that consistently maintaining around 145°F with a narrow steam wand really made a difference in achieving silky microfoam. Also, I’ve started pre-wetting my wand tip to prevent milk buildup, which helped keep the steam flow steady. One thing I’m curious about is how others optimize their timing between steaming and pouring, especially during busy mornings. Do you have any routines or tricks that help you sync the process seamlessly for latte art? I feel like that’s where many of us still stumble. Anyway, this article was a great reminder that mastery comes with patience—practice, deliberate technique, and attention to detail are all part of the journey to coffee perfection.