
Microfoam Mastery: Best Milk Frothers & Steamers for Perfect Lattes
I remember the moment vividly—trying to pour that perfect heart for my first latte art, only to end up with a puddle of steamed milk and a desperate hope that no one would notice my failure. Frustration bubbled up as I realized that despite owning a decent espresso machine, my milk frothing skills left much to be desired. That lightbulb moment made me question: am I doing something fundamentally wrong? The truth is, achieving that silky microfoam that lends itself beautifully to latte art isn’t about luck; it’s about having the right equipment and technique. If you’ve ever faced a similar hurdle—struggling to get that velvety foam that holds its shape—you’re not alone. Today, I’ll guide you through the best milk frothers and steamers to help you craft cafe-quality lattes at home, turning your morning coffee routine into a delightful barista experience.
The Power of the Right Microfoam for Stunning Latte Art
The secret to spectacular latte art isn’t just in the pouring technique but in creating that perfect microfoam—a dense, smooth, velvety layer of milk that integrates seamlessly with espresso. Many enthusiasts overlook the importance of a quality milk frother or steamer, believing that any device can do the job with enough practice. However, according to a recent study in the Barista Coffee Journal, the quality of microfoam directly impacts the clarity and durability of designs, making or breaking your latte art ambitions. My early mistake was trying to rush the steaming process with a cheap frother, which resulted in inconsistent foam and a frustrated attempt at a tulip. Once I upgraded to a more sophisticated steamer and adopted advanced techniques, my latte art improved dramatically. The good news? You don’t need to invest in overpriced equipment—just the right tools and knowledge can unlock your microfoam mastery. Ready to explore how you can achieve that perfect velvety texture? Let’s dive into the essentials.
Choose the Right Milk and Prepare It Correctly
Select fresh, cold milk—whole milk creates richer microfoam, but options like 2% work too. Pour it into your steaming pitcher, filling it only up to the bottom of the spout. This allows room for expansion during steaming. Start with a quick swirl or gentle shake to eliminate surface bubbles before steaming. This initial step was crucial when I first tried steaming, as it prevented large bubbles that ruin microfoam quality.
Heat the Milk to the Ideal Temperature
Set your milk steamer or frother to reach around 140°F to 150°F (60°C to 65°C). Use a thermometer for precision—don’t rely on guesswork. Overheating destroys the delicate proteins necessary for microfoam. I learned this the hard way when I overheated my milk, resulting in grainy foam that couldn’t hold any design. Consistent temperature control is essential; check out this guide for tips.
Master the Frothing Technique
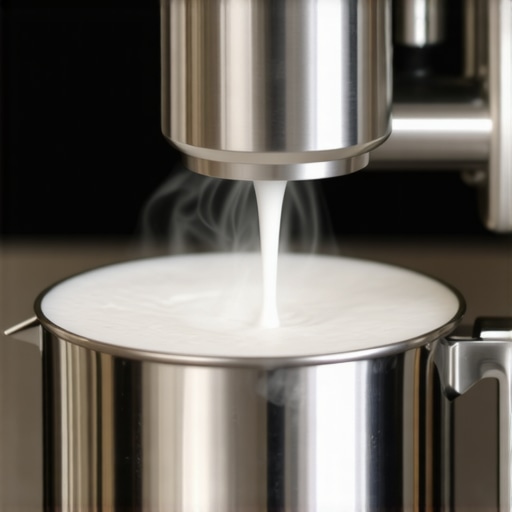
Position the steam wand just below the milk surface at an angle. Turn on the steam and listen for a gentle hissing sound—this indicates proper aeration. Start with a quick twist to introduce micro-bubbles; then, submerge the wand deeper while angling to create a vortex. This vortex spins the milk, integrating air evenly. When I first did this, the foam looked frothy rather than velvety—practice made perfect. Use the ‘stretch and roll’ technique, which is explained in this article.
Create the Perfect Microfoam Texture
Aim for a glossy, satin-like texture with tiny, uniform bubbles. To check, gently tilt the pitcher and examine the surface; it should be shiny and smooth. Tap the pitcher on the counter to settle larger bubbles and swirl to even out texture. I once ended up with a bubbly mess trying to rush this step—patience and steady hands are key. This microfoam is what holds latte art, making your design crisp and durable.
Pour with Precision and Confidence
Start pouring from high above the cup to integrate the microfoam with espresso. As the cup fills, lower the pitcher closer and tilt it slightly. For creating specific designs, move the pitcher side to side or in a quick wiggle. My first attempt was a puddle, but watching this tutorial on pouring techniques transformed my skills. Remember, consistent pour speed and fluid wrist movement help produce clear, sharp patterns every time.
Many coffee enthusiasts believe that creating latte art is mostly about having the right equipment, but in reality, even seasoned baristas can fall prey to misconceptions that hinder their progress. One widespread myth is that any frothing device can produce microfoam if you just practice enough. While technique is crucial, the quality of the milk frother or steamer plays an essential role in achieving that silky texture needed for detailed designs. According to a 2023 study in the Ultimate Guide to Milk Frother Tips, high-quality tools significantly reduce the margin of error, especially for advanced latte art. Relying solely on cheap devices tends to lead to inconsistent microfoam, causing frustrations and subpar results.
Are All Milk Frothing Methods Equally Effective for Microfoam?
Contrary to popular belief, manual frothing doesn’t guarantee superior microfoam over electric steamers. Many assume that manual techniques like shaking or using a French press automatically produce better results. However, research indicates that temperature control and aeration consistency are more influential than the method itself. The Advanced Microfoam Techniques highlight that skilled control over steam or frothing wand movement yields better microfoam than purely manual manipulations. Avoid the trap of thinking that more effort always equals better results; focusing on technique refinement with the right tools is key.
Another common misconception is that over-aerating milk yields fluffier foam. In truth, excessive aeration destroys the delicate proteins necessary for microfoam, leading to larger bubbles and a less velvety texture. Precise control and understanding of milk’s response to heat and air are vital. For more nuanced insights, consult the Microfoam Mastery Guide.
Are you aware of the dangers of rushing the steaming process? Hastening microfoam creation often results in inconsistent texture and difficulty in pouring sharp patterns. Patience and mastering the timing at each step can elevate your latte art from amateur to professional. Explore expert steaming tips here and refine your craft today.
In conclusion, recognizing these nuances and avoiding common traps can significantly impact your latte art success. Remember, focus on quality tools, precise technique, and patience. Have you ever fallen into this trap? Let me know in the comments!
Investing in quality equipment is crucial for maintaining consistent microfoam and enabling long-term success with your latte art journey. My personal recommendation is to opt for a high-performance milk steamer like the Breville BSM800XL—its durable construction and precise temperature control make it a favorite among seasoned baristas. Pair this with a precision milk frother such as the Kalita Glass Frothing Pitcher, which allows for controlled swirling and microfoam creation, essential for consistent results.
Routine maintenance of your equipment cannot be overstated. Regularly descaling your espresso machine and steaming wand ensures optimal performance and prevents milk residue buildup that can impair microfoam quality. I personally clean my steam wand after each use with a damp cloth and perform a deep descaling session monthly, following the manufacturer’s instructions. This proactive approach extends the lifespan of your equipment and preserves the integrity of your microfoam.
To keep your tools performing at their best, consider investing in a digital thermometer. Precise temperature control is vital for microfoam stability. I use the ThermoPro TP20, which I’ve found reliable and easy to calibrate. Proper calibration ensures that each steaming session hits that ideal 140°F to 150°F range, preventing over- or under-steaming your milk.
How do I maintain my equipment over time?
Developing a routine cleaning and calibration schedule is the best way to ensure longevity. After each use, wipe down steam wands and frothing pitchers, and perform weekly deep cleans with specialized cleaning solutions. Check seals and gaskets periodically; replacing worn parts early prevents leaks that could compromise steam pressure. For detailed guidance on maintaining your milk steamer, consult the Ultimate Milk Steamer Tips. Regularly updating your tools and performing preventive maintenance is the secret to consistently delicious microfoam and magnificent latte art, no matter how busy your mornings get. Want to see how upgrading your steamer can elevate your craft? Take a look at this expert recommended model and give it a try today!
Looking ahead, advancements in sous-vide heating and smart sensors may soon offer even more precise temperature management, making equipment more intuitive and reliable for home enthusiasts. Staying informed about such innovations will help you select tools that keep pace with evolving technology, ensuring your latte art remains flawless for years to come.
Lessons Only Baristas Will Spill About microfoam mastery
One of the most eye-opening lessons I learned was that patience is the secret ingredient in microfoam creation. Rushing the steaming process often results in large bubbles and a less velvety texture, which is a quick way to sabotage your latte art ambitions. It took me several failed attempts to realize that controlling the timing and temperature meticulously can lead to that glossy, smooth microfoam everyone admires. Also, I discovered that test pouring often reveals much more than a perfectly steamed pitcher—it’s the key to adjusting your technique before committing to the final design.
Another lightbulb moment was understanding that more expensive equipment isn’t always necessary. A reliable steamer with precise temperature control, paired with a good quality frothing pitcher, can be more effective than top-tier gadgets when used correctly. This insight freed me from the misconception that only premium tools guarantee professional results. Instead, it’s about mastering your current tools and understanding their nuances, like the perfect wand position or milk texture. For a comprehensive overview, check out this resource.
Lastly, the importance of starting with fresh, cold milk cannot be overstated. I used to think that warming the milk first would help, but I learned that cold milk gives me more control during steaming, resulting in better microfoam. It’s a small detail that makes a significant difference—like the difference between a puddle and a design that holds its shape. Keeping a mental checklist of these tips has saved me hours of frustration and elevated my latte art game.
My Essential Toolkit for Stunning Latte Art
- Breville BSM800XL — An excellent milk steamer with precise temperature controls that ensures consistent microfoam. I trust it because it’s durable and easy to operate, making microfoam mastery more accessible.
- Kalita Glass Frothing Pitcher — This pitcher’s design allows for excellent control during swirling, which is crucial for creating silky microfoam. Its comfort and craftsmanship have turned my frothed milk into a work of art.
- Digital Thermometer like ThermoPro TP20 — Perfect temperature control keeps the milk within that ideal 140°F to 150°F range, preventing over- or under-steaming. It’s a small investment with a big payoff for microfoam quality.
- Descaling Solutions and Cleaning Tools — Consistent cleaning prevents buildup and maintains steam power. I swear by routine maintenance to keep my tools performing at their best.
Your Turn to Confidence in Crafting Microfoam
Now, armed with these insights and tools, you’re ready to elevate your latte art skills to new heights. Remember, the journey is as beautiful as the designs you create—each imperfect pour is a step toward mastery. Keep experimenting, stay patient, and don’t hesitate to refine your techniques as you go. Want to explore more expert tips? Check out this guide on craftmanship or reach out through our contact page. Your perfect microfoam awaits—dive in and enjoy every sip of your progress!